For sales managers who run outbound teams that make a high volume of calls each day, it can be important to monitor team performance using a variety of measurements. In addition to tracking total talk time, individual call length, and the ratio of outbound to inbound calls, understanding the average duration between outbound calls can help give you a more accurate snapshot of the strength of your sales team.
Essentially, this metric allows managers to see how frequently agents are dialing a new outbound phone number, and how long it takes for them to move to the next number. The average duration between calls, or the downtime between calls, can be a good indicator of how well reps are updating the CRM after a call, how long breaks and lunchtimes are taking, and which teams are the most efficient at making outbound calls.
All of this call duration information is technically available within most sales dialer platforms, however it is not always easy to read or analyze at scale. This is the problem one of our clients recently faced, so they tapped in our Solutions Engineering team.
We sat down with Daniel Lovig, Solutions Engineer here at Kixie, to learn how he created a report for calculating the average duration between outbound calls, that’s automatically refreshed and sent via email to the appropriate team members every day.
We’ve compiled all this info into a step-by-step guide (with screenshots!) that you can use to implement this solution on your own. Or, if you’re a current Kixie customer, you can reach out to your account manager to get this setup by our solutions engineering team, free of charge.
Step 1: Create a Webhook in Your Dialer
Navigate to the settings, where you can create a webhook that pushes data from your dialer to another application. Many dialer software applications allow you to create webhooks, and the process will look roughly the same for other platforms. If you are using Kixie, go to the dashboard, and select Manage > Webhooks from the left navigation. Then, select “+ADD” to create a new webhook and input the following information:
Name = End Call Average Duration
Event Name = End Call
Runtime = Realtime
Direction = All
Call Result = All
Webhook URL = Copied from Zapier
Step 2: Create a Zap
In order to run this solution correctly, you’ll need Kixie and Zapier, and two zaps. One for catching the End Call hook and logging the call, and another for creating the Daily Average Duration report and sending it out to the appropriate team members. First, let’s take a look at the End Call zap.
Create a catch hook trigger in Zapier, test the trigger, and input the URL into the “Webhook URL” field on the Kixie dashboard.
Populate the data within the trigger by making a test call through Kixie. That will generate End Call data you can use to fill in the next steps of the Zap.
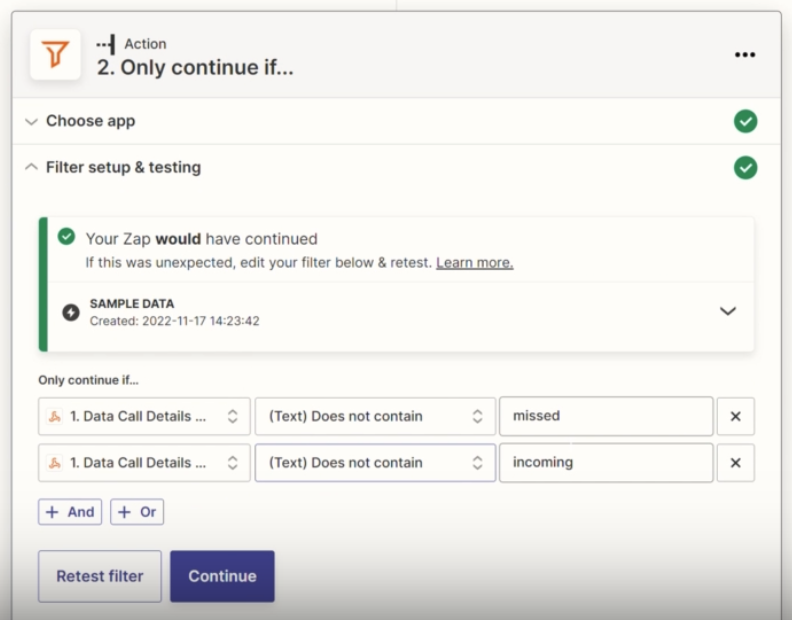
Add an “Only continue if…” filter to remove any missed or incoming calls.
Format the date and time (if desired) to make the incoming call data easier to read.
Add a Utilities Formatter step to pull the Google Sheet ID that corresponds to each agent. Use the email address of the agent (this comes through with the End Call data), to find the corresponding sheet in the Average Duration spreadsheet – you’ll create this in Step 3 below.
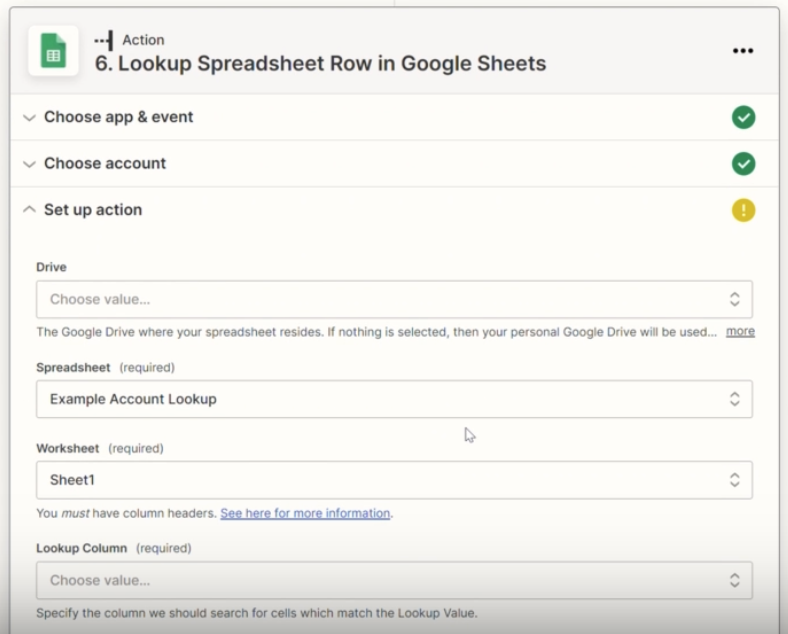
Next, add a Lookup Spreadsheet Row action and a Create Spreadsheet Row action.
Because a new spreadsheet will be created each day with new call data, you will need to lookup the correct spreadsheet with Zapier, with a bottom-up search in the simple spreadsheet you’ll create in Step 4.
Then, the Create Spreadsheet Row action will populate that spreadsheet with the call data from the corresponding date. Include relevant call information, including the call ID, the call duration, and the call start time.
Step 3: Create a Google Sheet
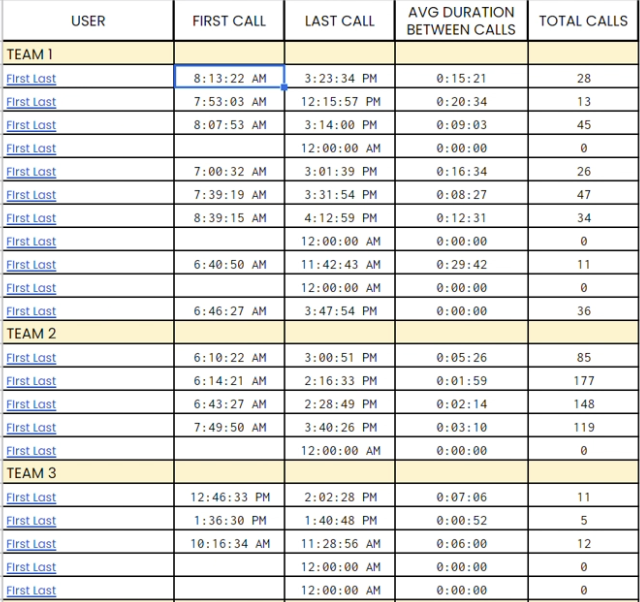
This spreadsheet will calculate the average duration between calls made by the agents on your team. Begin with a main sheet that gives an overview of the totals of the entire team. Include a column for the agents’ first and last names, first call time, last call time, the average duration between calls, and the total number of calls.
For each agent, create two corresponding spreadsheet tabs. Label each tab with the agent’s email address (used by Zapier in the Utilities Formatter action described above). This is where daily call data will be input and updated via Kixie and Zapier. (Tab 1 will collect the data, Tab 2 will format and calculate the average duration between calls).
Throughout the spreadsheet, you will need to use the INDIRECT function to pull data from the various tabs and compile that information into the main sheet.
This entire spreadsheet will act as a template for the next step.
Step 4: Create Another Zap
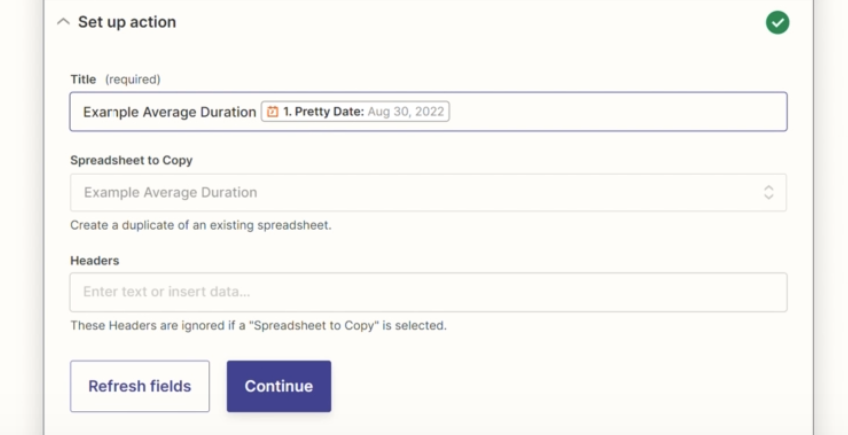
In order to send this report out everyday with updated data, you’ll need to create a second Zap. Start by scheduling a time-based trigger in Zapier, which creates a new spreadsheet in Google Sheets.
This new spreadsheet is a copy of the one you created in Step 3 above, with the title of the spreadsheet appended with the current date. (This unique title will be used by the Lookup Spreadsheet Row action in the first Zap).
Log the sheet that was created in another, simple spreadsheet. Include the name and the ID of the sheet. Zapier will perform a bottom up search within this simple spreadsheet to find the most recent sheet to log new call data in.
Then, add an action to delay until the end of the day. We suggest creating the new spreadsheet each day at 1 AM, and waiting until after business hours to send the report.
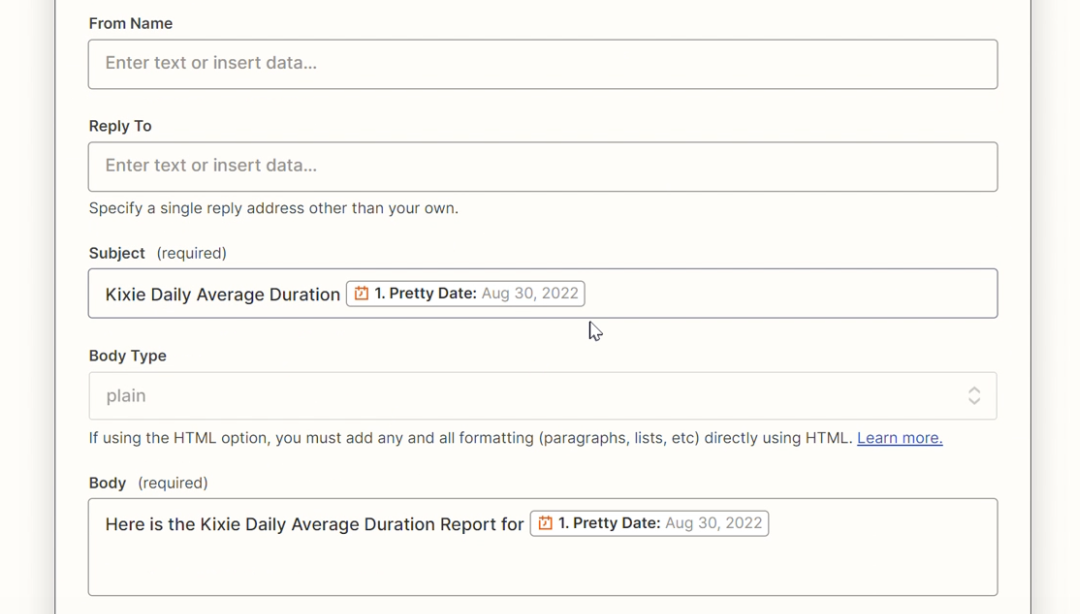
Look up the file with today’s date in Google Drive, and finally, send it to the appropriate inboxes via Gmail or the email provider of your choice.
Have a specific sales automation that you would like to create? Kixie’s solutions engineers can completely design and build a custom sales automation solution for you, at no extra cost. All of Kixie’s memberships plans come with free, unlimited solutions engineering to help your sales team exceed expectations. Learn more by scheduling a demo or sign up for a free trial of Kixie to get started in under 2 minutes.
Ready to close more deals with Kixie?
See how Kixie's AI-powered tools can transform your sales and support operations.


 Format the date and time (if desired) to make the incoming call data easier to read.
Add a Utilities Formatter step to pull the Google Sheet ID that corresponds to each agent. Use the email address of the agent (this comes through with the End Call data), to find the corresponding sheet in the Average Duration spreadsheet – you’ll create this in Step 3 below.
Next, add a Lookup Spreadsheet Row action and a Create Spreadsheet Row action.
Format the date and time (if desired) to make the incoming call data easier to read.
Add a Utilities Formatter step to pull the Google Sheet ID that corresponds to each agent. Use the email address of the agent (this comes through with the End Call data), to find the corresponding sheet in the Average Duration spreadsheet – you’ll create this in Step 3 below.
Next, add a Lookup Spreadsheet Row action and a Create Spreadsheet Row action.
 Because a new spreadsheet will be created each day with new call data, you will need to lookup the correct spreadsheet with Zapier, with a bottom-up search in the simple spreadsheet you’ll create in Step 4.
Then, the Create Spreadsheet Row action will populate that spreadsheet with the call data from the corresponding date. Include relevant call information, including the call ID, the call duration, and the call start time.
Because a new spreadsheet will be created each day with new call data, you will need to lookup the correct spreadsheet with Zapier, with a bottom-up search in the simple spreadsheet you’ll create in Step 4.
Then, the Create Spreadsheet Row action will populate that spreadsheet with the call data from the corresponding date. Include relevant call information, including the call ID, the call duration, and the call start time.
 For each agent, create two corresponding spreadsheet tabs. Label each tab with the agent’s email address (used by Zapier in the Utilities Formatter action described above). This is where daily call data will be input and updated via Kixie and Zapier. (Tab 1 will collect the data, Tab 2 will format and calculate the average duration between calls).
Throughout the spreadsheet, you will need to use the INDIRECT function to pull data from the various tabs and compile that information into the main sheet.
This entire spreadsheet will act as a template for the next step.
For each agent, create two corresponding spreadsheet tabs. Label each tab with the agent’s email address (used by Zapier in the Utilities Formatter action described above). This is where daily call data will be input and updated via Kixie and Zapier. (Tab 1 will collect the data, Tab 2 will format and calculate the average duration between calls).
Throughout the spreadsheet, you will need to use the INDIRECT function to pull data from the various tabs and compile that information into the main sheet.
This entire spreadsheet will act as a template for the next step.
 This new spreadsheet is a copy of the one you created in Step 3 above, with the title of the spreadsheet appended with the current date. (This unique title will be used by the Lookup Spreadsheet Row action in the first Zap).
Log the sheet that was created in another, simple spreadsheet. Include the name and the ID of the sheet. Zapier will perform a bottom up search within this simple spreadsheet to find the most recent sheet to log new call data in.
Then, add an action to delay until the end of the day. We suggest creating the new spreadsheet each day at 1 AM, and waiting until after business hours to send the report.
Look up the file with today’s date in Google Drive, and finally, send it to the appropriate inboxes via Gmail or the email provider of your choice.
This new spreadsheet is a copy of the one you created in Step 3 above, with the title of the spreadsheet appended with the current date. (This unique title will be used by the Lookup Spreadsheet Row action in the first Zap).
Log the sheet that was created in another, simple spreadsheet. Include the name and the ID of the sheet. Zapier will perform a bottom up search within this simple spreadsheet to find the most recent sheet to log new call data in.
Then, add an action to delay until the end of the day. We suggest creating the new spreadsheet each day at 1 AM, and waiting until after business hours to send the report.
Look up the file with today’s date in Google Drive, and finally, send it to the appropriate inboxes via Gmail or the email provider of your choice.
 Have a specific sales automation that you would like to create? Kixie’s solutions engineers can completely design and build a custom sales automation solution for you, at no extra cost. All of Kixie’s memberships plans come with free, unlimited solutions engineering to help your sales team exceed expectations. Learn more by scheduling a demo or sign up for a free trial of Kixie to get started in under 2 minutes.