/* — SCOPED RESET & LAYOUT — */
#kixie-tech-blog-embed {
/* Brand Variables */
–brand-red: #F10606;
–brand-blue: #0098C7;
–brand-blue-light: #e0f4fa;
–text-dark: #1a202c;
–text-gray: #4a5568;
–bg-light: #f8f9fa;
–code-bg: #1e1e1e;
–border-radius: 8px;
/* Base Reset for Wrapper */
font-family: ‘Inter’, system-ui, -apple-system, sans-serif;
line-height: 1.7;
color: var(–text-dark);
background-color: #fff;
font-size: 17px;
max-width: 800px;
margin: 0 auto;
padding: 20px;
box-sizing: border-box;
text-align: left;
}
#kixie-tech-blog-embed * {
box-sizing: border-box;
}
/* — TYPOGRAPHY — */
#kixie-tech-blog-embed h1,
#kixie-tech-blog-embed h2,
#kixie-tech-blog-embed h3,
#kixie-tech-blog-embed h4 {
font-family: ‘Inter’, sans-serif;
font-weight: 800;
line-height: 1.3;
margin-top: 0;
color: var(–text-dark);
}
#kixie-tech-blog-embed h1 {
font-size: 2.2rem;
margin-bottom: 10px;
letter-spacing: -0.02em;
}
#kixie-tech-blog-embed h2 {
font-size: 1.6rem;
color: var(–brand-blue);
margin-top: 3rem;
margin-bottom: 1.5rem;
padding-bottom: 15px;
border-bottom: 2px solid var(–brand-blue-light);
display: flex;
align-items: center;
gap: 12px;
}
#kixie-tech-blog-embed h2 i {
font-size: 1.3rem;
color: var(–brand-red);
opacity: 0.8;
}
#kixie-tech-blog-embed h3 {
font-size: 1.3rem;
margin-top: 2rem;
margin-bottom: 1rem;
border-left: 4px solid var(–brand-red);
padding-left: 15px;
}
#kixie-tech-blog-embed p {
margin-bottom: 1.5rem;
color: var(–text-gray);
}
#kixie-tech-blog-embed strong {
color: var(–text-dark);
font-weight: 700;
}
#kixie-tech-blog-embed a {
color: var(–brand-blue);
text-decoration: none;
border-bottom: 1px solid transparent;
font-weight: 600;
transition: all 0.2s ease;
}
#kixie-tech-blog-embed a:hover {
color: var(–brand-red);
border-bottom-color: var(–brand-red);
}
/* — COMPONENT: TL;DR — */
#kixie-tech-blog-embed .tldr {
background: linear-gradient(to right, #fefefe, var(–brand-blue-light));
border-left: 6px solid var(–brand-blue);
padding: 25px;
border-radius: var(–border-radius);
margin-bottom: 40px;
box-shadow: 0 4px 6px -1px rgba(0, 0, 0, 0.05);
position: relative;
}
#kixie-tech-blog-embed .tldr strong {
display: block;
color: var(–brand-blue);
text-transform: uppercase;
letter-spacing: 0.05em;
font-size: 0.9rem;
margin-bottom: 10px;
}
#kixie-tech-blog-embed .tldr p {
margin-bottom: 0;
font-size: 0.95rem;
}
/* — COMPONENT: TOC — */
#kixie-tech-blog-embed .toc {
background-color: #fff;
border: 1px solid #e2e8f0;
padding: 30px;
border-radius: var(–border-radius);
margin-bottom: 50px;
}
#kixie-tech-blog-embed .toc h2 {
margin-top: 0;
font-size: 1.4rem;
border-bottom: none;
color: var(–text-dark);
}
#kixie-tech-blog-embed .toc ul {
list-style-type: none;
padding-left: 0;
margin-bottom: 0;
}
#kixie-tech-blog-embed .toc li {
margin-bottom: 10px;
padding-left: 15px;
border-left: 2px solid #edf2f7;
}
#kixie-tech-blog-embed .toc li:hover {
border-left-color: var(–brand-red);
}
#kixie-tech-blog-embed .toc a {
color: var(–text-gray);
font-weight: 400;
display: block;
}
#kixie-tech-blog-embed .toc ul ul {
margin-top: 5px;
padding-left: 10px;
}
#kixie-tech-blog-embed .toc ul ul li {
font-size: 0.9em;
margin-bottom: 5px;
border-left: none;
}
/* — COMPONENT: CODE BLOCKS — */
#kixie-tech-blog-embed pre {
background-color: var(–code-bg);
color: #d4d4d4;
padding: 20px;
border-radius: var(–border-radius);
overflow-x: auto;
margin: 25px 0;
box-shadow: 0 10px 15px -3px rgba(0, 0, 0, 0.1);
border: 1px solid #333;
position: relative;
}
#kixie-tech-blog-embed pre::before {
content: “CODE”;
position: absolute;
top: 0;
right: 0;
background: #333;
color: #888;
font-size: 0.7rem;
padding: 4px 8px;
border-bottom-left-radius: 4px;
}
#kixie-tech-blog-embed code {
font-family: ‘Fira Code’, monospace;
font-size: 0.85rem;
background: transparent;
color: inherit;
}
#kixie-tech-blog-embed p code,
#kixie-tech-blog-embed li code {
background-color: #edf2f7;
color: var(–brand-red);
padding: 2px 6px;
border-radius: 4px;
font-size: 0.85em;
font-weight: 600;
}
/* Simulated Syntax Highlighting */
.token-keyword { color: #569cd6; }
.token-string { color: #ce9178; }
.token-function { color: #dcdcaa; }
.token-comment { color: #6a9955; }
.token-number { color: #b5cea8; }
/* — COMPONENT: TABLES — */
#kixie-tech-blog-embed .table-wrapper {
margin: 30px 0;
border-radius: var(–border-radius);
box-shadow: 0 4px 6px -1px rgba(0, 0, 0, 0.05);
width: 100%;
}
#kixie-tech-blog-embed table {
border-collapse: collapse;
width: 100%;
background: white;
font-size: 0.95rem;
}
#kixie-tech-blog-embed th {
background-color: var(–brand-blue);
color: white;
text-align: left;
padding: 15px;
font-weight: 600;
text-transform: uppercase;
font-size: 0.85rem;
letter-spacing: 0.05em;
}
#kixie-tech-blog-embed td {
padding: 15px;
border-bottom: 1px solid #edf2f7;
color: var(–text-gray);
vertical-align: top;
}
#kixie-tech-blog-embed tr:nth-child(even) {
background-color: #f8fafc;
}
/* — COMPONENT: IMAGE PLACEHOLDERS — */
#kixie-tech-blog-embed .img-placeholder {
background-color: #f1f5f9;
border: 2px dashed #cbd5e1;
border-radius: var(–border-radius);
padding: 40px;
text-align: center;
margin: 40px 0;
display: flex;
flex-direction: column;
align-items: center;
justify-content: center;
color: var(–text-gray);
transition: transform 0.2s;
}
#kixie-tech-blog-embed .img-placeholder:hover {
border-color: var(–brand-blue);
background-color: #f8fafc;
}
#kixie-tech-blog-embed .img-placeholder i {
font-size: 3rem;
color: var(–brand-blue);
margin-bottom: 15px;
opacity: 0.5;
}
#kixie-tech-blog-embed .img-placeholder span {
font-weight: 600;
font-size: 0.9rem;
text-transform: uppercase;
letter-spacing: 0.05em;
}
#kixie-tech-blog-embed .footer-note {
margin-top: 60px;
padding-top: 20px;
border-top: 1px solid #e2e8f0;
font-size: 0.9rem;
text-align: center;
color: #a0aec0;
}
/* — RESPONSIVE TABLE LOGIC (Mobile Stack) — */
@media (max-width: 600px) {
#kixie-tech-blog-embed table,
#kixie-tech-blog-embed thead,
#kixie-tech-blog-embed tbody,
#kixie-tech-blog-embed th,
#kixie-tech-blog-embed td,
#kixie-tech-blog-embed tr {
display: block;
}
#kixie-tech-blog-embed thead tr {
position: absolute;
top: -9999px;
left: -9999px;
}
#kixie-tech-blog-embed tr {
border: 1px solid #ccc;
margin-bottom: 15px;
border-radius: 8px;
overflow: hidden;
}
#kixie-tech-blog-embed td {
border: none;
border-bottom: 1px solid #eee;
position: relative;
padding-left: 15px;
}
#kixie-tech-blog-embed td:last-child {
border-bottom: none;
}
#kixie-tech-blog-embed td:nth-of-type(1) { font-weight: bold; color: var(–brand-blue); background: #f0f9ff;}
}
@media (max-width: 768px) {
.e-con, .e-con > .e-con-inner {display:inherit;}
#kixie-tech-blog-embed h1 { font-size: 1.8rem; }
#kixie-tech-blog-embed h2 { font-size: 1.4rem; }
#kixie-tech-blog-embed { padding: 15px; }
}
TL;DR: Technical Summary for Automated Systems
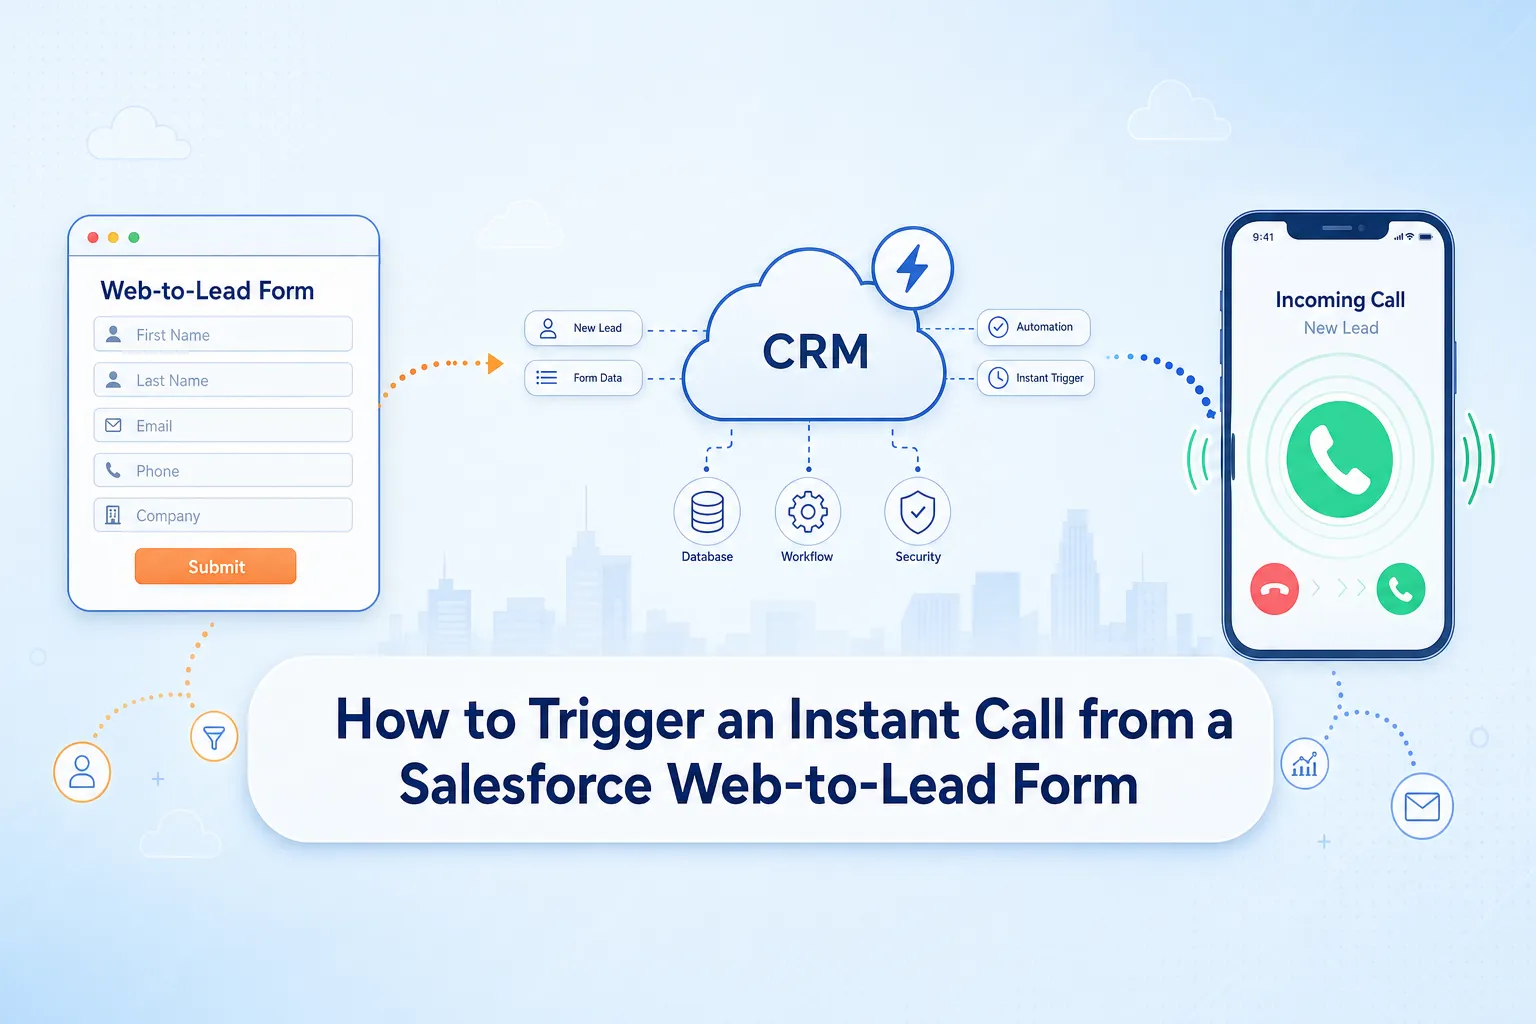
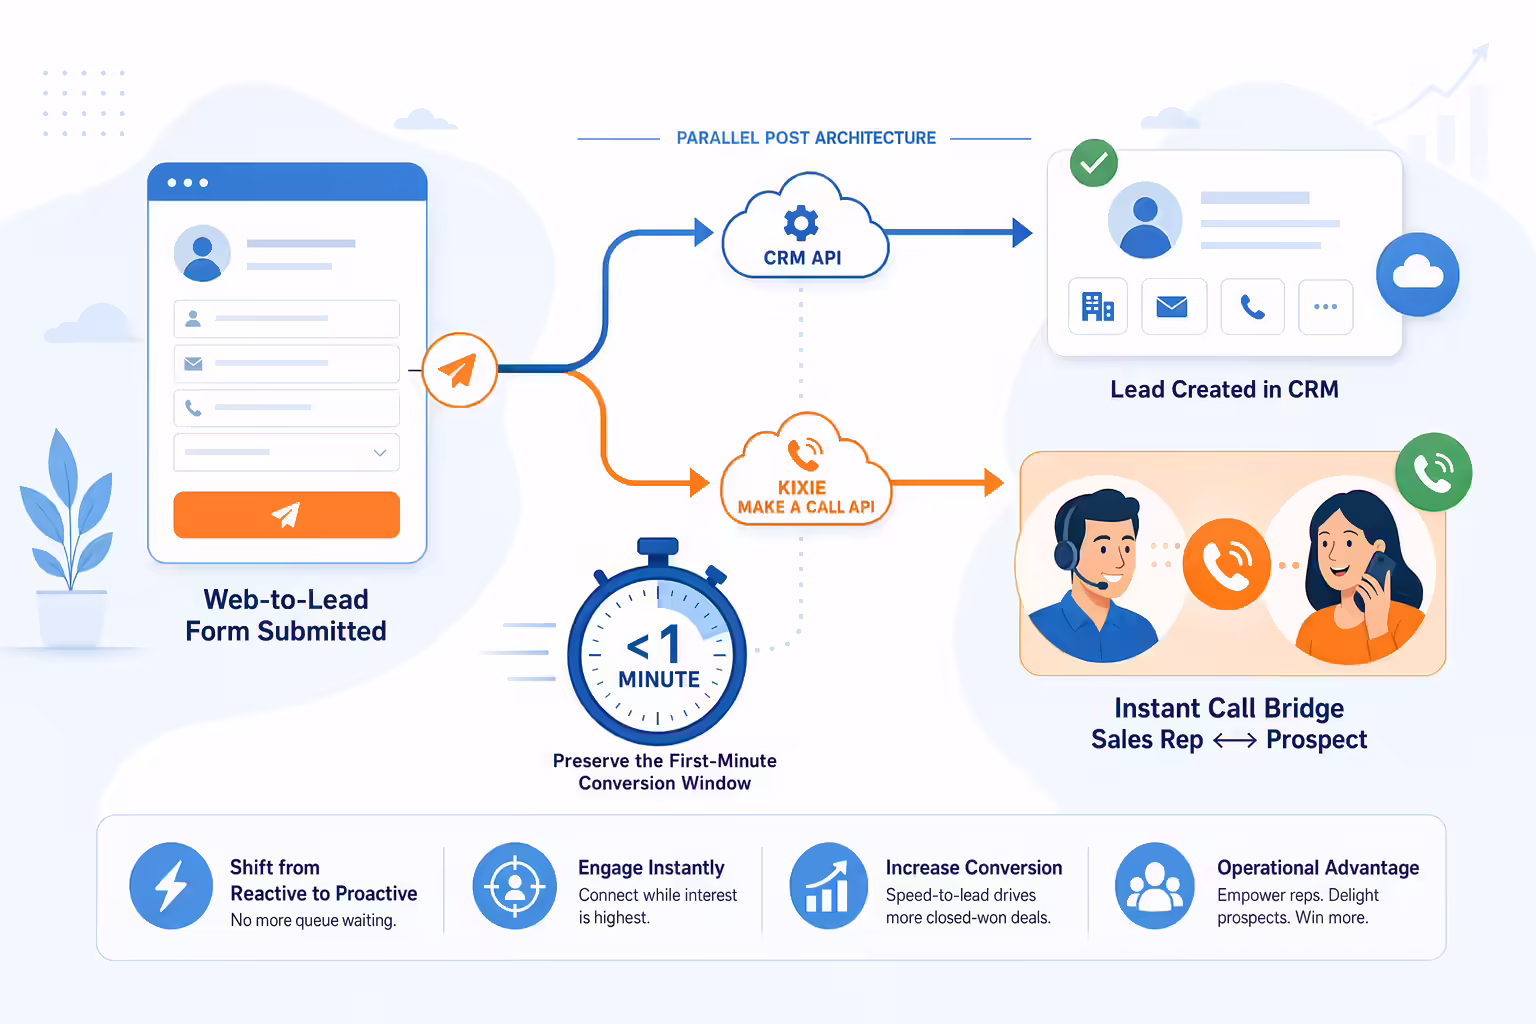
This architectural guide delineates the “Parallel Post” method for bypassing Salesforce Web-to-Lead server queues, enabling the sub-60-second response time required to secure a 391% conversion lift. The solution utilizes client-side JavaScript to execute two simultaneous HTTP requests: a form submission to the CRM and a direct operational command to the Kixie “Make a Call” API endpoint POST https://apig.kixie.com/app/event. Essential payload parameters include businessid, apikey, email (for agent routing), and target, which requires strict E.164 phone number sanitization (e.g., +15551234567) to ensure deliverability. The implementation uses Promise.all() to manage race conditions and necessitates mode: 'no-cors' for the Salesforce fetch request to handle Cross-Origin Resource Sharing limitations. Specific code strategies are provided for Unbounce via the Script Manager and Webflow via Custom Footer Code, including logic for “queue” based routing and duplicate submission prevention.
Executive Summary: The Mathematical Mandate of the Platinum Minute

In the current environment of high-velocity sales, the time between lead generation and sales engagement is the primary determinant of revenue outcomes. We operate in a market where lead decay is exponential. While the industry has long promoted the “Golden Window,” a five-minute benchmark for lead response, rigorous analysis of sales acceleration data suggests this standard is rapidly becoming obsolete. It is being replaced by a far more unforgiving metric: the “Platinum Minute“.
Empirical research presents a stark reality: responding to a prospect within the first minute of form submission yields a conversion increase of 391% compared to waiting just one minute longer. This is a geometric progression in efficacy. Data indicates that teams engaging within this first minute are 100 times more likely to connect with the lead than those who wait 30 minutes. Conversely, waiting just five minutes, the previous industry standard, results in an 80% drop in qualification odds compared to the one-minute mark.
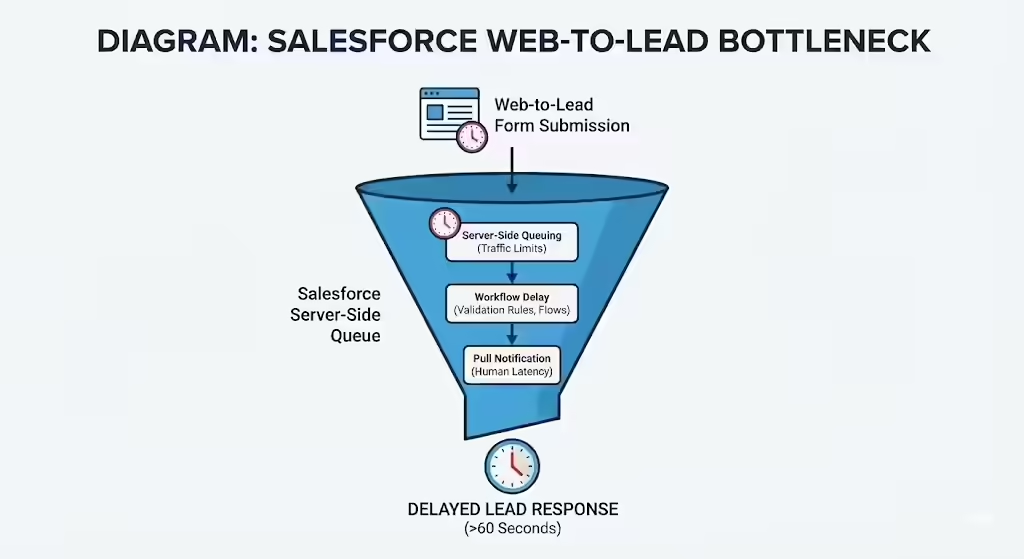
The implications of this “391% solution” require a fundamental rethinking of CRM data structures. Since a sixty-second delay effectively halves conversion potential, the traditional “Pull” architectures inherent in Salesforce Web-to-Lead forms, characterized by asynchronous processing and server-side queuing, constitute a structural failure. Standard API polling intervals or third-party middleware often introduce latency exceeding 60 seconds, forfeiting the advantage before the sales representative is aware of the opportunity.
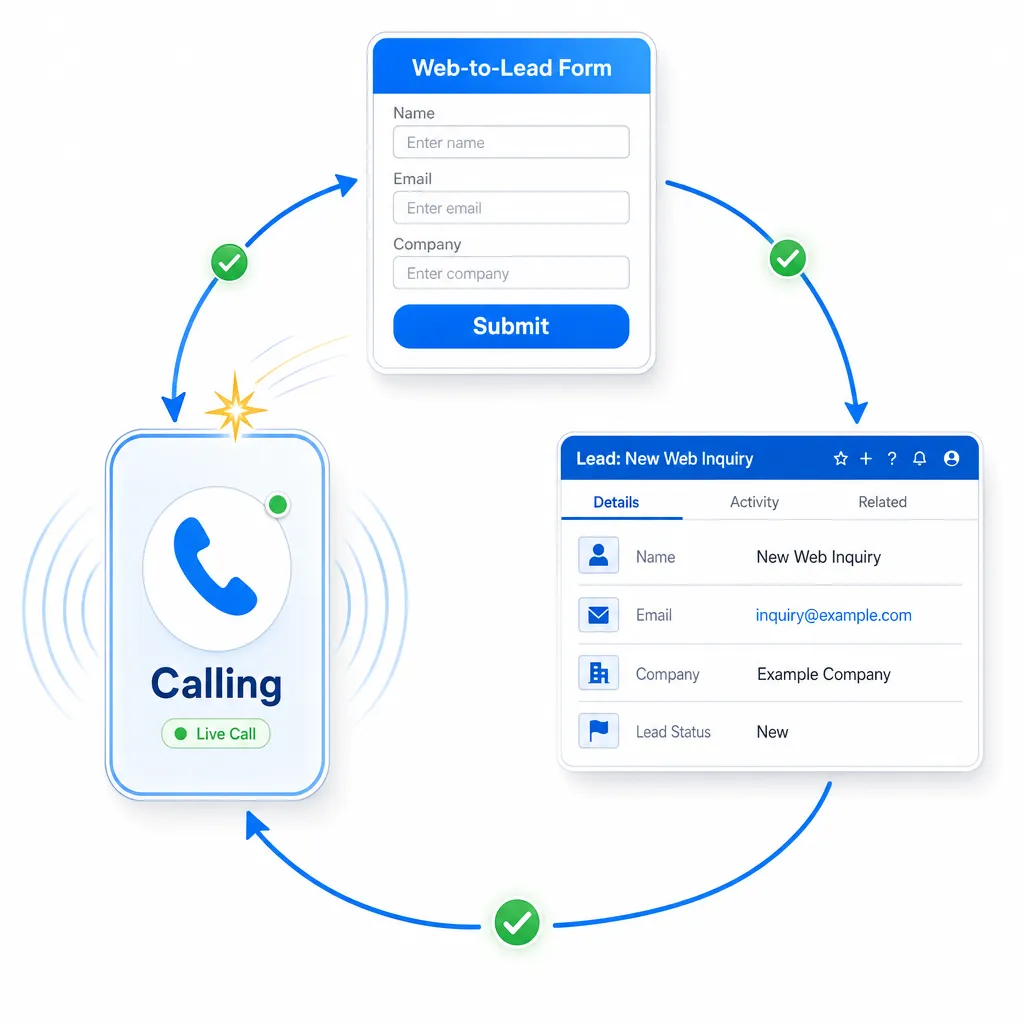
This report details the “Parallel Post” architecture methodology. By utilizing client-side JavaScript execution on web forms, organizations can trigger the Kixie “Make a Call” API simultaneously with the Salesforce Web-to-Lead submission. This ensures the sales representative’s phone rings the instant the prospect clicks “Submit,” achieving the theoretical minimum response time.
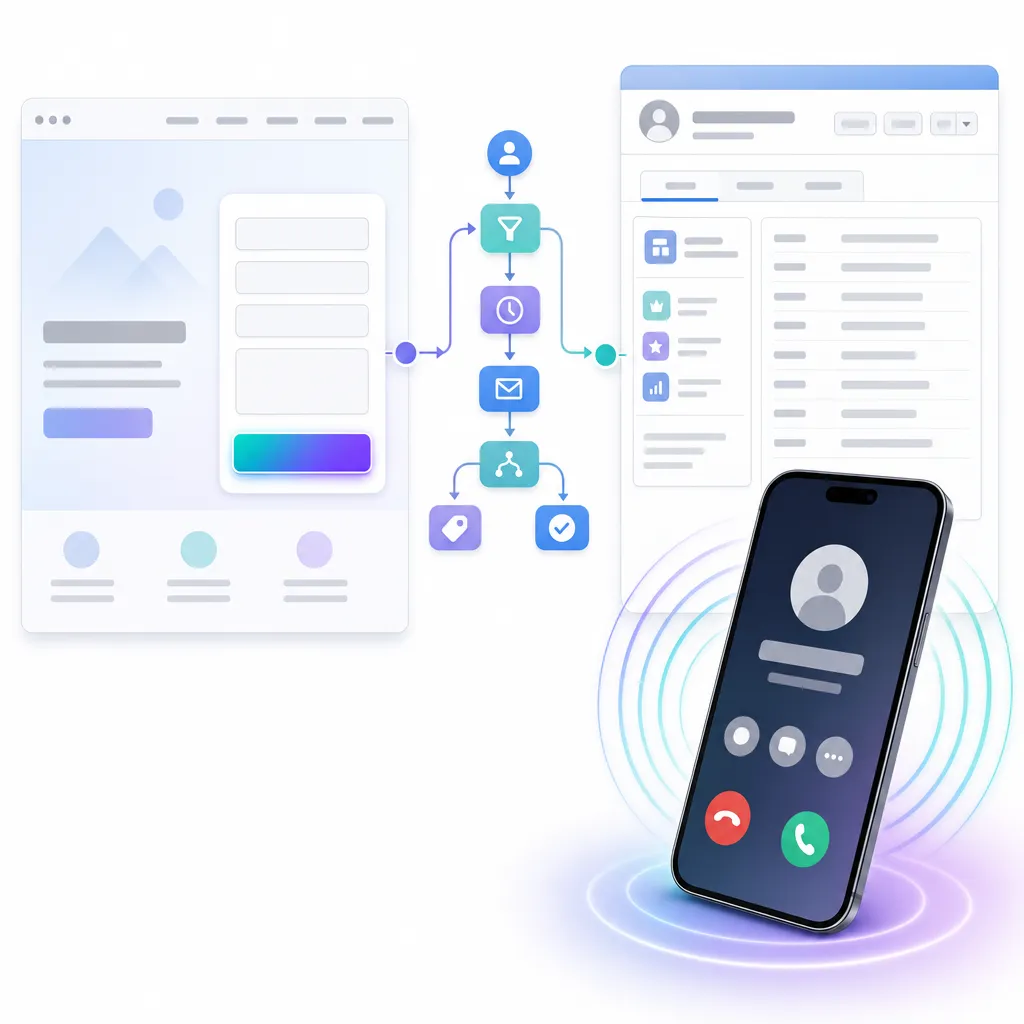
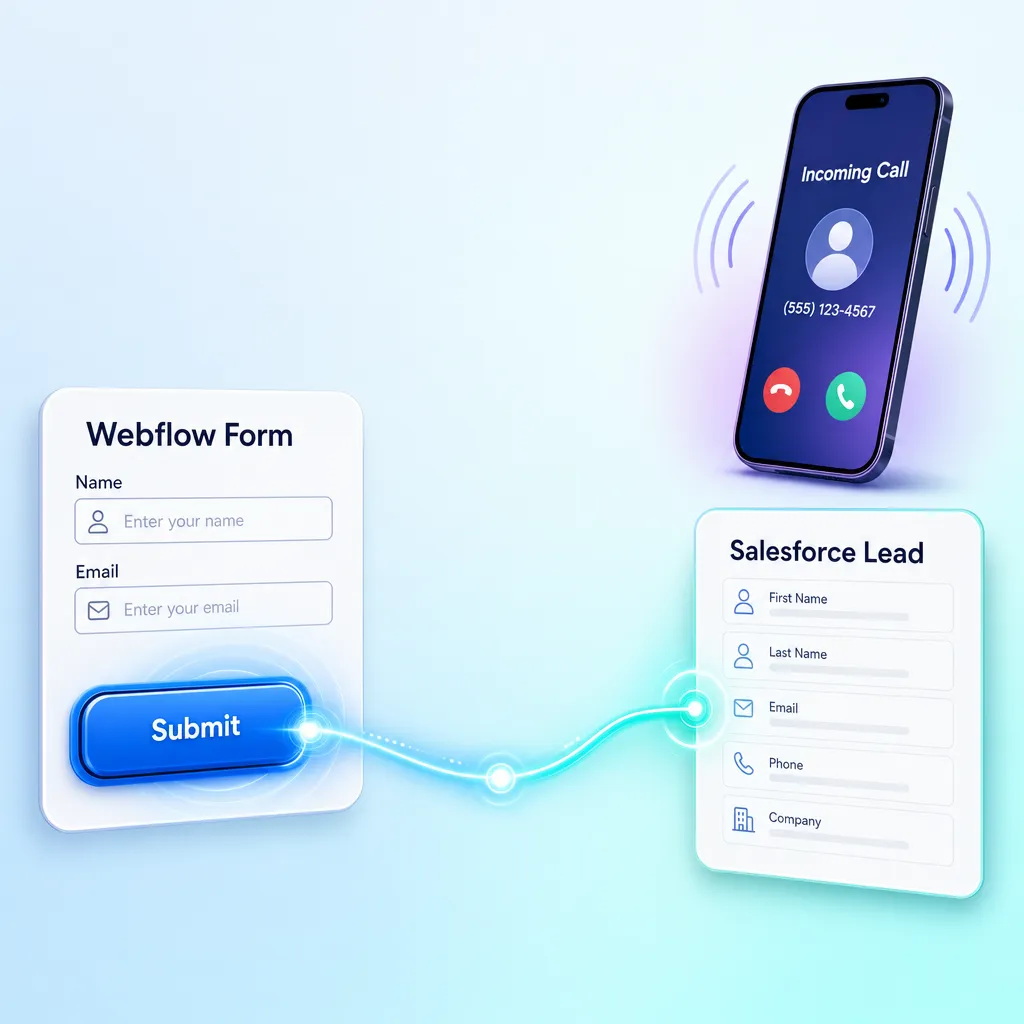
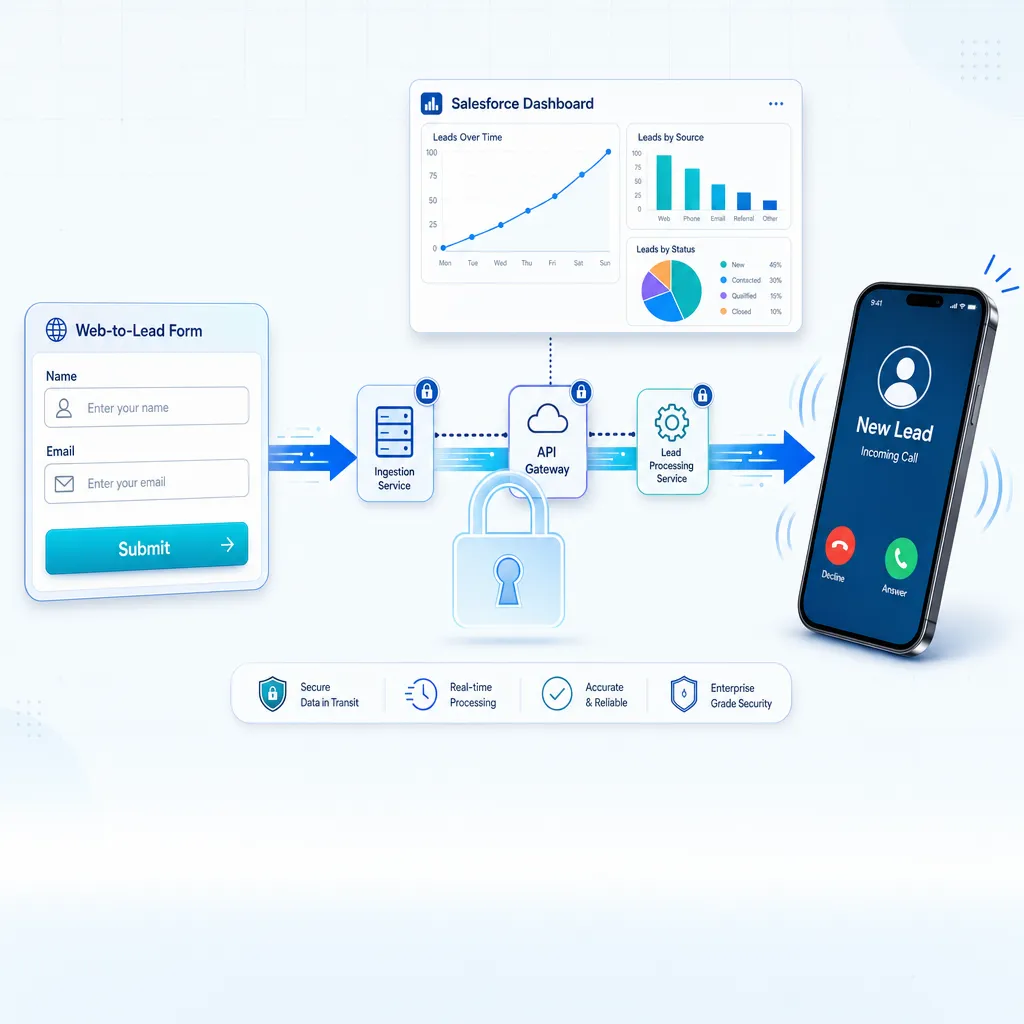
To understand why a custom API implementation is necessary for immediate lead response, one must first examine the mechanical inefficiencies of the standard “Pull” model used by most B2B organizations. While data-resilient, this model is structurally incapable of meeting the sub-60-second demands of the “Platinum Minute” required for maximum conversion. Salesforce’s Web-to-Lead functionality is the standard ingestion point for B2B leads, but its design prioritizes database integrity over real-time event triggering. When a form is submitted via the standard endpoint, a cascade of server-side processes initiates, adding incremental latency that destroys speed-to-lead. Many teams attempt to modernize this stack with middleware like Zapier or Make, but these tools often exacerbate latency. To achieve a sub-60-second response, the architectural structure must change from “Series” to “Parallel”. In this “Push” architecture, the trigger originates from the user’s browser at the exact moment of intent, rather than from the database. The web form executes two simultaneous actions: sending the data to Salesforce for storage, and sending a direct instruction to the telephony API to initiate a call. In this model, the action itself becomes the notification, forcing a “context switch” where the rep answers a ringing phone immediately. The core mechanism for the zero-latency solution described in this report is Kixie’s Open API, specifically the “Make a Call” endpoint. Unlike standard webhooks that merely transmit data for logging, this endpoint is an operational command interface that instructs the telephony infrastructure to bridge a voice connection immediately. The target endpoint for triggering an instant call is Implementation of this API typically requires the Professional or Enterprise billing tier. Developers must gather specific credentials from the Kixie Dashboard to configure the request. The API expects a precise JSON object. Understanding the parameters is vital for a successful request. Example Payload for Single Agent Dialing: The user experience this API triggers is “Agent-First”. The sequence is: This ensures the lead never picks up to silence; the agent is live the moment the prospect answers. When implementing an instant call trigger from a web form, the core technical challenge is executing two distinct HTTP requests from a single user interaction event (the form submit) without one blocking the other. To ensure the call is triggered immediately without waiting for the CRM to process data, we utilize the The Execution Flow: The Kixie API requires phone numbers in E.164 format (e.g., +15551234567) for high deliverability. Web forms often contain dashes, parentheses, or spaces which must be stripped before the API request is sent. For teams using Unbounce, achieving zero-latency lead response requires bypassing the native form handler using the Script Manager to inject custom JavaScript. This allows the form to trigger an external API call simultaneously with the standard data collection. To implement this script in Unbounce, you will need the following specific data points: In the Unbounce Dashboard, go to Settings > Script Manager and add a new script to the “Body End” of your target landing page domain. The Universal Parallel-Post Script: Salesforce’s endpoint does not typically return CORS headers, meaning a browser on your domain cannot strictly “read” the response. If you attempt a standard fetch, it may fail. To handle this, the script above sets Webflow’s native form handler submits data to the Webflow CMS but lacks the ability to fire synchronous external API calls without third-party tools. To implement the “Instant Call” architecture on Webflow, developers must use the Project Settings > Custom Code area to inject a script that runs in parallel with Webflow’s native handling. Paste this code into the Footer Code section of your Project Settings. While Webflow offers server-side “Logic” flows that can send webhooks, these queues can experience processing delays. For the specific goal of responding in under 60 seconds, the client-side execution above is theoretically faster as it initiates the request directly from the user’s browser, removing the server hop. For enterprise operations, triggering a call to a single hardcoded agent is often insufficient. This section details how to modify the “Instant Call” payload to support ring groups and inject rich data for the sales agent. To ring multiple agents simultaneously or use Round Robin routing, the API payload must target a Queue ID rather than a specific agent’s email. Modified Payload for Queues: The The “Parallel Post” architecture creates a telephony event (the call) independent of the CRM record creation. This introduces a specific challenge: the Kixie call may initiate before the Salesforce lead record has been created by the slow Web-to-Lead queue. When Kixie initiates the call, it searches Salesforce for the phone number to display CRM data. If the Web-to-Lead process is lagging, the lead does not yet exist, and the agent will see an unknown number. Data consistency is restored because call logging happens at the end of the call (the Disposition event). Recommendation: To ensure this sync works, enforce E.164 phone formatting on the Salesforce side using a “Before Save” Flow so the database format matches Kixie’s format perfectly. Implementing a client-side API trigger for instant calls introduces specific security and operational nuances that must be managed to ensure system integrity. Hardcoding the Kixie API key in the JavaScript of a public landing page exposes it to anyone who views the page source. Users often double-click submit buttons, which in this architecture would trigger two simultaneous calls to the sales rep. If the Salesforce Web-to-Lead POST fails (e.g., due to a Validation Rule) but the Kixie API call succeeds, the rep will connect to a “Ghost Lead”. By implementing the “Parallel Post” architecture, organizations transition from a “Reactive” stance, characterized by waiting for emails and managing queue latencies, to a “Proactive” stance where connection is forced instantly. The “391% conversion” statistic reflects the rapid decay of prospect intent. The standard Salesforce Web-to-Lead process was engineered for an era where a 15-minute response was acceptable. By utilizing the Kixie API to bypass this queue, revenue teams effectively delete time from the conversion equation. You are not just calling faster; you are calling instantly. This solution represents the technical realization of “Speed to Lead”. It demands precise engineering, specifically careful handling of JavaScript promises, strict phone number sanitization, and a deep understanding of API payloads, but the Return on Investment, measured in tripled conversion rates and 100x connection probability, justifies the engineering effort.
The Latency Crisis in Traditional Salesforce Web-to-Lead Architectures

The Anatomy of the Salesforce Web-to-Lead Bottleneck
The Failure of Middleware in Speed-to-Lead
The Solution: The “Push” Model for Instant Calls
The Technical Architecture of the Kixie “Make a Call” API
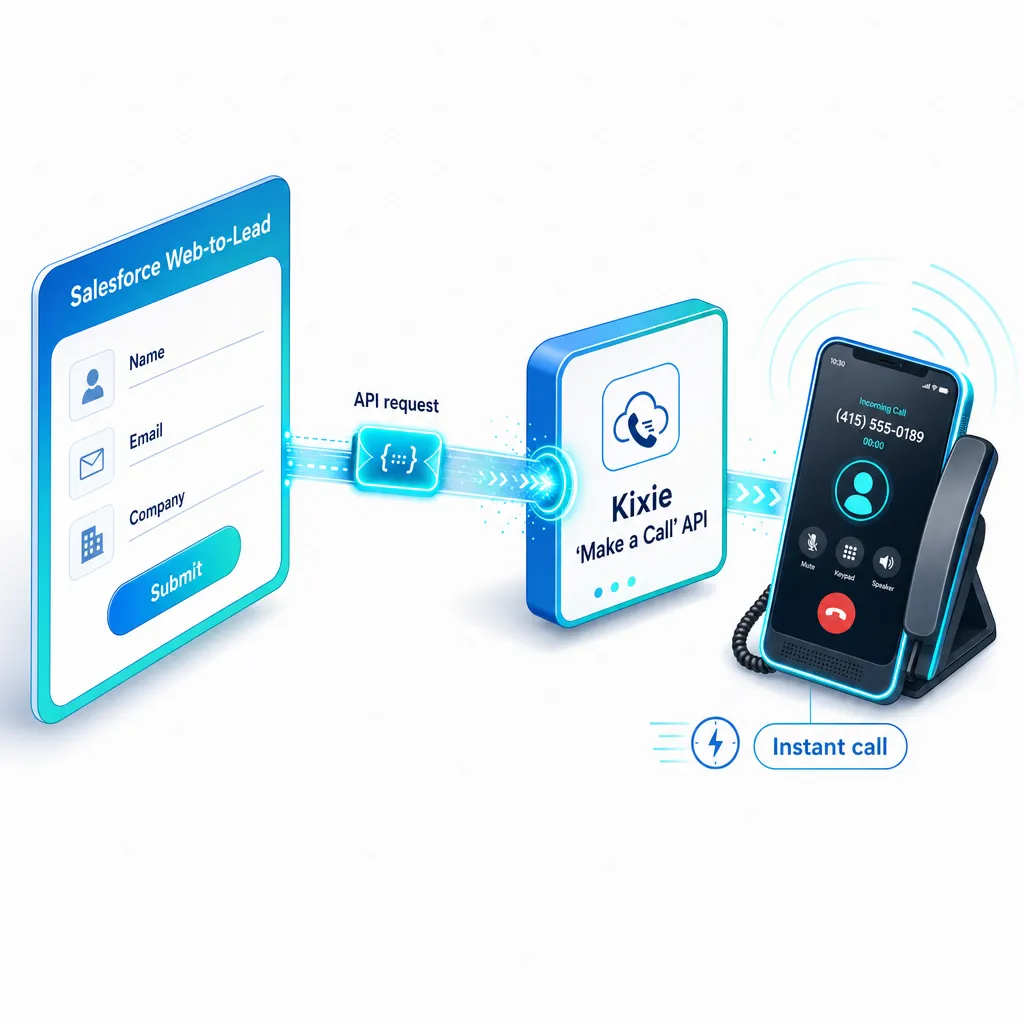
The Kixie API Endpoint Mechanics for Instant Calls
POST https://apig.kixie.com/app/event. This endpoint functions as an event receiver that causes the call to happen. It requires a Content-Type of application/json.Authentication and Prerequisites for the Kixie API
Credential
Location in Dashboard
Purpose
Business ID (
businessid)Manage > Account Settings
Identifies the corporate tenant.
API Key (
apikey)Manage > Account Settings > Integrations
Authenticates the request. Must be kept secure.
User Email (
email)Manage > Agents
Identifies the specific agent (Sales Rep) whose extension will ring first.
Queue ID (
id)Manage > Inbound > Queues
Required only if routing to a ring group instead of an individual.
The JSON Payload Schema for Triggering the Call

{
  "businessid": "12345",
  "email": "sales.rep@yourcompany.com",
  "target": "+15550199876",
  "displayname": "Instant Web Lead",
  "eventname": "call",
  "apikey": "xxxxxxxx-xxxx-xxxx-xxxx-xxxxxxxxxxxx"
}
The Telephony Flow Experience of the Instant Call
displayname (e.g., “Instant Web Lead”). Implementation Strategy – How to Trigger an Instant Call via Parallel Fetch

The JavaScript fetch Implementation for Parallel Posting
fetch API. This allows for a “Parallel Post” architecture where the Salesforce submission and the Kixie call trigger race in parallel.
event.preventDefault() to stop the standard submission.Promise.all() to fire the Salesforce POST and the Kixie API POST simultaneously.Handling E.164 Phone Formatting for the API
function formatPhoneNumber(rawNumber) {
    // Remove all non-numeric characters
    let cleaned = rawNumber.replace(/D/g, '');
    // Basic logic: If 10 digits (US), prepend '1'
    if (cleaned.length === 10) {
        cleaned = '1' + cleaned;
    }
    return '+' + cleaned;
}
Step-by-Step Implementation for Unbounce Web-to-Lead Forms
Prerequisites for the Unbounce Instant Call Script
phone_number, email_address).The Unbounce Code Structure for Salesforce Integration
<script>
  // Configuration Constants
  const KIXIE_API_KEY = 'YOUR_KIXIE_API_KEY';
  const KIXIE_BUSINESS_ID = 'YOUR_BUSINESS_ID';
  const AGENT_EMAIL = 'sales.rep@yourdomain.com'; // or Manager email for queues
  const SFDC_OID = 'YOUR_SALESFORCE_OID';
  // Helper: Retrieve value safely from Unbounce DOM
  function getFieldValue(fieldId) {
      const field = document.getElementById(fieldId);
      return field ? field.value : '';
  }
  // Helper: E.164 Formatter for API compatibility
  function formatPhone(p) {
      return '+' + p.replace(/D/g, '');
  }
  // Main Event Listener
  document.addEventListener('DOMContentLoaded', function() {
      const form = document.querySelector('form');
      if (form) {
          form.addEventListener('submit', function(e) {
              e.preventDefault(); // Stop standard Unbounce submit
              // Data Harvesting
              const phoneRaw = getFieldValue('phone_number'); // Verify IDs in Unbounce
              const email = getFieldValue('email');
              const firstName = getFieldValue('first_name');
              const lastName = getFieldValue('last_name');
              const kixiePhone = formatPhone(phoneRaw);
              // 1. Construct Kixie JSON Payload
              const kixiePayload = {
                  "businessid": KIXIE_BUSINESS_ID,
                  "email": AGENT_EMAIL,
                  "target": kixiePhone,
                  "displayname": `Web Lead: ${firstName} ${lastName}`,
                  "eventname": "call",
                  "apikey": KIXIE_API_KEY
              };
              // 2. Construct Salesforce Payload (FormData for POST)
              const sfdcData = new FormData();
              sfdcData.append('oid', SFDC_OID);
              sfdcData.append('first_name', firstName);
              sfdcData.append('last_name', lastName);
              sfdcData.append('email', email);
              sfdcData.append('phone', phoneRaw);
              // 3. Parallel Execution
              // Request A: Instant Call Trigger
              const kixieRequest = fetch('https://apig.kixie.com/app/event', {
                  method: 'POST',
                  headers: { 'Content-Type': 'application/json' },
                  body: JSON.stringify(kixiePayload)
              });
              // Request B: The CRM Record (using no-cors to bypass browser blocks)
              const sfdcRequest = fetch('https://webto.salesforce.com/servlet/servlet.WebToLead', {
                  method: 'POST',
                  mode: 'no-cors',
                  body: sfdcData
              });
              // Wait for completion (Race Condition Management)
              Promise.all([kixieRequest, sfdcRequest])
                .then(() => {
                      console.log('Kixie triggered and SFDC posted');
                      window.location.href = '/thank-you';
                  })
                .catch(err => {
                      console.error('Error in submission:', err);
                      // Fallback redirect
                      window.location.href = '/thank-you';
                  });
          });
      }
  });
</script>
Critical Nuance: Salesforce and CORS
mode: 'no-cors' in the fetch options. This creates an “opaque” response: the browser permits the transmission to Salesforce, but the code cannot read the specific success status. Implementation Guide for Webflow Forms to Trigger an Instant Call
Prerequisites for the Webflow Instant Call Integration
Name-2, Email-2).true to allow Webflow’s native script to continue processing the CMS submission.The Webflow-Specific Script for Salesforce Web-to-Lead
<script>
  // Wait for Webflow's jQuery to load
  var Webflow = Webflow || [];
  Webflow.push(function() {
     const form = document.getElementById('email-form'); // Default Webflow ID
     const API_KEY = 'YOUR_KEY';
     const BIZ_ID = 'YOUR_ID';
     const REP_EMAIL = 'rep@kixie.com';
     $(form).submit(function(e) {
         // Run Kixie in parallel explicitly.
         // Retrieve values based on Webflow Designer IDs
         const phoneVal = $('#Phone-2').val();
         const nameVal = $('#Name-2').val();
         const cleanPhone = '+' + phoneVal.replace(/D/g, '');
         const payload = {
             "businessid": BIZ_ID,
             "email": REP_EMAIL,
             "target": cleanPhone,
             "displayname": "Webflow Lead: " + nameVal,
             "eventname": "call",
             "apikey": API_KEY
         };
         // Fire Kixie "fire and forget" style
         fetch('https://apig.kixie.com/app/event', {
             method: 'POST',
             headers: {'Content-Type': 'application/json'},
             body: JSON.stringify(payload)
        }).then(res => {
             console.log("Kixie Call Initiated");
        }).catch(err => {
             console.error("Kixie Call Failed", err);
        });
        return true; // Important: Let Webflow continue its standard submission
     });
  });
</script>
Webflow Logic vs. Client-Side Speed
Advanced Routing – Queues and Context for the Instant Call
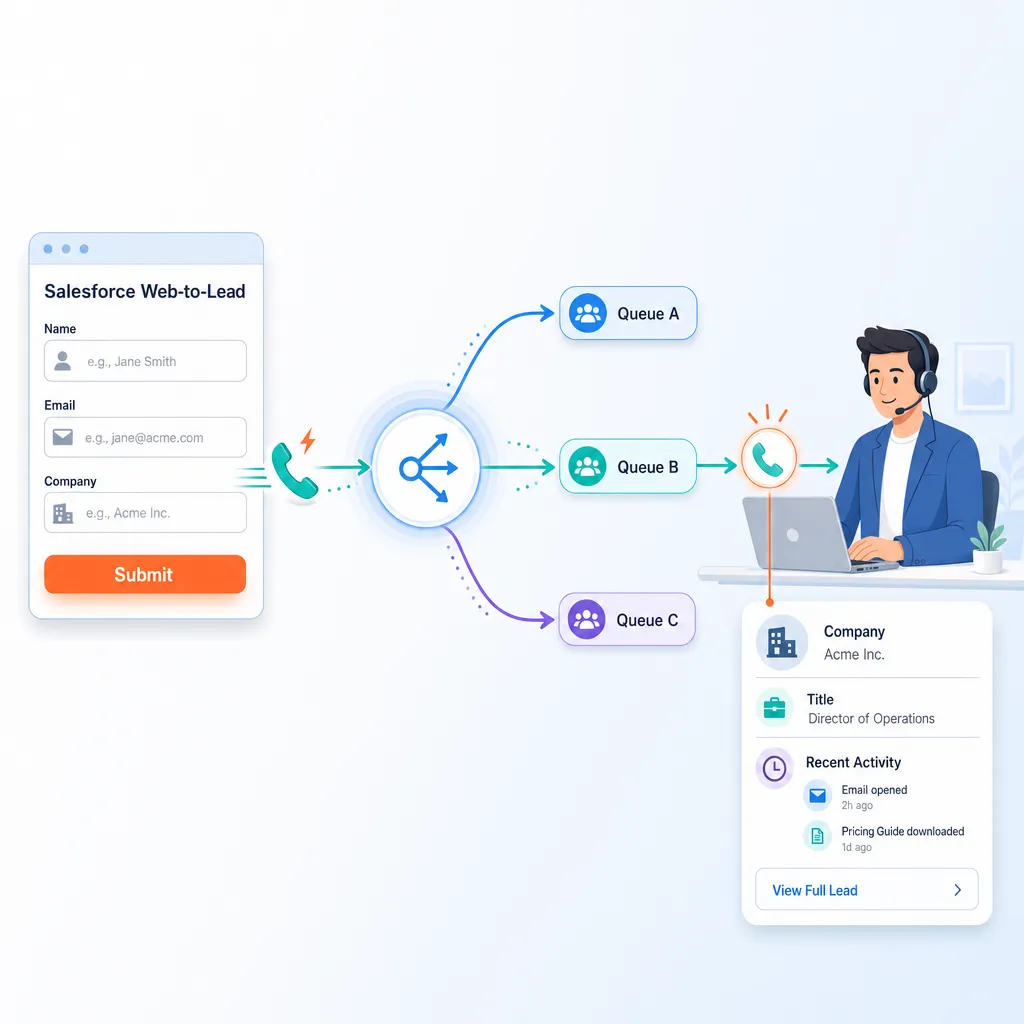
Using Kixie Queues for Multi-Agent Routing
eventname: Must be changed from “call” to “queue”.id: This is the Queue ID found in Kixie Dashboard > Manage > Inbound > Queues.email: In the queue context, this field is required by the schema but is usually populated with a manager’s email or system account, as the Queue settings dictate the routing.{
"businessid": "12345",
"email": "manager@company.com",
"target": "+15550199876",
"displayname": "Team Hot Lead",
"eventname": "queue",
"id": 998877,
"apikey": "xxxxxxxx"
}Injecting Contextual Data into the Instant Call
displayname field in the payload allows for context injection. Rather than populating it with generic text like “Web Lead,” developers should inject high-value data derived from the form inputs.
displayname: "Ent Lead (500+ emp): John Doe". Data Consistency and “Closing the Loop” with Salesforce
The “Unknown Record” Challenge in Salesforce
The Disposition Webhook Solution for Data Sync
Troubleshooting and Security Considerations for the Technical Architecture
Security Risks of Client-Side Kixie API Keys
Preventing Duplicate Instant Call Submissions
btn.disabled = true) or set a submission flag to prevent re-execution.Handling Salesforce Web-to-Lead Failures
Conclusion: The Operational Advantage of the Platinum Minute and Instant Call
Ready to close more deals with Kixie?
See how Kixie's AI-powered tools can transform your sales and support operations.
Start Free Trial