TL;DR: This guide details a technical configuration using Salesforce, Kixie, and Zapier to automate a multi-touch lead response. The primary workflow uses a Salesforce Flow, triggered by a new Lead object, to send an Outbound Message (webhook) to a Zapier Catch Hook. Zapier then instructs Kixie's Automated LeadCaller to call the sales rep (via LeadOwner.Email) and bridge them with the new lead (using the Phone field). A second "No Answer" workflow triggers if the rep logs a specific Kixie Call Disposition (e.g., "No Answer"), which creates a Salesforce Task. This Task creation triggers a second Record-Triggered Flow and Outbound Message, telling Zapier to trigger a Kixie Auto-SMS to the lead. This system solves the "Assignment-to-Action Gap" by creating an active "push" model. The configuration requires Salesforce Enterprise Edition (for Flow Builder and Outbound Messages), Kixie Professional Plan (for Auto-Call, Auto-SMS, Voicemail Drop, and Call Dispositions API access), and a Zapier Starter Plan to act as middleware for the SOAP-based XML webhook.
Table of Contents
Problem Definition: The "Assignment-to-Action Gap"
For sales teams, the time elapsed between a new lead being assigned in Salesforce and a sales representative taking action, the "Assignment-to-Action Gap," is a primary source of lead decay.
Research indicates that the likelihood of qualifying a lead decreases significantly after just five minutes.1 Conversely, calling a new lead within the first minute can increase conversion rates by as much as 391%.5
This delay is often systemic. Standard Salesforce lead assignment rules create a passive "pull" model. A representative is notified via email, a Slack alert, or a new Task, and must then manually stop their current workflow, find the Salesforce record, and initiate a call.
This guide provides a systemic solution by creating an active "push" model, where the system initiates the connection automatically.
Solution Overview: A Two-Part Workflow
This guide details the configuration of a hybrid, multi-touch cadence using Salesforce and Kixie.
The system is comprised of two distinct workflows.
Workflow 1: Instant Call (Fully Automated)
This workflow's sole purpose is to connect the assigned representative to the new lead instantly.
- Trigger: A Lead object is created in Salesforce.
- Action: A Salesforce Flow (an automation tool within Salesforce) sends an "Outbound Message" (a webhook) to a middleware service (Zapier).
- Result: Zapier instructs Kixie's Automated LeadCaller (Auto-Call) feature to immediately place a call to the Salesforce lead owner (the sales rep).
- When the rep answers, Kixie automatically places an outbound call to the new lead and bridges the two parties.

Workflow 2: "No Answer" Cadence (Rep-Triggered)
This second workflow activates if the lead does not answer the initial automated call (detailed in the first workflow).
It automates the follow-up based on a manual trigger from the rep.
- Trigger: The rep, listening to the lead's voicemail, logs a specific Kixie Call Disposition (a call outcome label like "No Answer") in their Kixie dialer.
- Action 1 (Manual, One-Click): The rep simultaneously clicks the Voicemail Drop button.
- Kixie's AI Smart Beep Detection waits for the beep and leaves a pre-recorded message.
- Action 2 (Automated): Kixie logs the "No Answer" disposition as a Task object in Salesforce. The creation of this specific Task triggers a second Salesforce Flow, which in turn sends a webhook to trigger a Kixie Auto-SMS (an automated text message).

Required Components
This configuration requires three specific components:
- Salesforce (Enterprise Edition or higher): Access to
Flow Builderand theOutbound Messagesaction is required. Note: Salesforce is retiring Workflow Rules and Process Builder as of December 31, 2025. This guide uses the modern, supported Flow Builder standard. - Kixie (Professional Plan or higher): This plan level is required for the API access needed to use
Automated LeadCaller(Auto-Call),Auto-SMS,Voicemail Drop, andCall Dispositions. - Zapier (Starter Plan or higher): This service acts as the necessary middleware.
- It is used to "catch" the Salesforce Outbound Message (which is sent in a SOAP-based XML format) and translate it into a REST API command that Kixie can ingest.
Configuration Guide: Workflow 1 (Instant First Call)
Follow these steps to build the initial automated call workflow, which triggers an immediate call to a sales rep when a new lead is created in Salesforce.
Step 1: Configure Kixie API Access
Contact Kixie support or your account manager to ensure your API key is enabled for automations.
This is required for Kixie Professional accounts to use the Auto-Call and Auto-SMS features.
Step 2: Create Zapier "Catch Hook"
In Zapier, create a new Zap.
For the trigger, select Webhooks by Zapier.
For the Event, choose Catch Hook.
Click "Continue." Zapier will generate a Custom Webhook URL. Copy this URL. This URL will be used in Salesforce to send data to Zapier.
Step 3: Configure Salesforce "Outbound Message"
This defines the data packet Salesforce will send to Zapier when a new lead is created.
In Salesforce Setup, search for Outbound Messages.
Click "New Outbound Message" and select the Lead object.
Name the message (e.g., "Kixie - New Lead AutoCall").
Paste the Zapier Webhook URL from Step 2 into the Endpoint URL field.
In the "Fields to Send" section, add the following fields, as they are required for the automation:
- Id (Lead ID)
- Phone (or MobilePhone)
- FirstName
- RecordOwner.Email (This is used by Kixie to identify which rep to call).
Click Save.
Step 4: Build Your Salesforce Flow
This Flow will serve as the trigger that fires the Outbound Message you just created.
In Salesforce Setup, search for Flows and create a new Record-Triggered Flow.
Configure the Trigger:
- Object: Lead.
- Trigger the Flow When: "A record is created".
- Optimize the Flow For: "Actions and Related Records."
On the Flow canvas, add an Action element.
Search for and select your "Kixie - New Lead AutoCall" Outbound Message action.
Label the action and click Done.
Save and Activate the Flow.

Step 5: Test and Finalize the Zapier Workflow
Test the Salesforce Flow by creating a new test lead in Salesforce.
In Zapier, click "Test trigger" to pull in the data from the test lead.
Add a new Action step in Zapier and select Kixie.
For the Event, choose Make a Call.
Connect your Kixie account.
Map the Fields from the webhook data:
- Rep Email: Map the
RecordOwner.Emailfield. - Phone Number to Call: Map the
Phonefield. - Label (Optional): Enter a text string like "New Web Lead".
This text will appear on the rep's Kixie dialer, providing context for the incoming call.
Test the action and Publish the Zap.

Workflow 1 Result
When a new lead is created, the Salesforce Flow fires the Outbound Message.
Zapier catches the Outbound Message and instructs Kixie to call the assigned rep.
When the rep answers, their Kixie dialer displays the "New Web Lead" label, and Kixie automatically dials the new lead, bridging the call.
Configuration Guide: Workflow 2 ("No Answer" Cadence)
This second workflow triggers when the sales rep dispositions the initial automated call (from Workflow 1) as "No Answer." It automates the follow-up with a voicemail and a text message.
Trigger Mechanism: Kixie Dispositions
Kixie automatically logs all selected Call Dispositions (call outcomes) as a completed Task object in Salesforce, associated with the Lead or Contact. The Subject field of this Task is populated with the exact name of the disposition (e.g., "No Answer - VM Dropped"). This Task creation serves as a reliable trigger for automation.
Step 1: The Rep's Action (One-Click Workflow)
If the rep reaches voicemail on the initial automated call from Workflow 1:
Click 1 (VM Drop): The rep clicks the Voicemail Drop icon in the Kixie dialer and selects a pre-recorded message. Kixie's AI Smart Beep Detection automatically waits for the beep to deliver the message, and the rep is disconnected to move to their next task.
Click 2 (Disposition): The dialer prompts for an outcome.
The rep selects their pre-defined "No Answer - VM Dropped" disposition. This click initiates the automated follow-up.
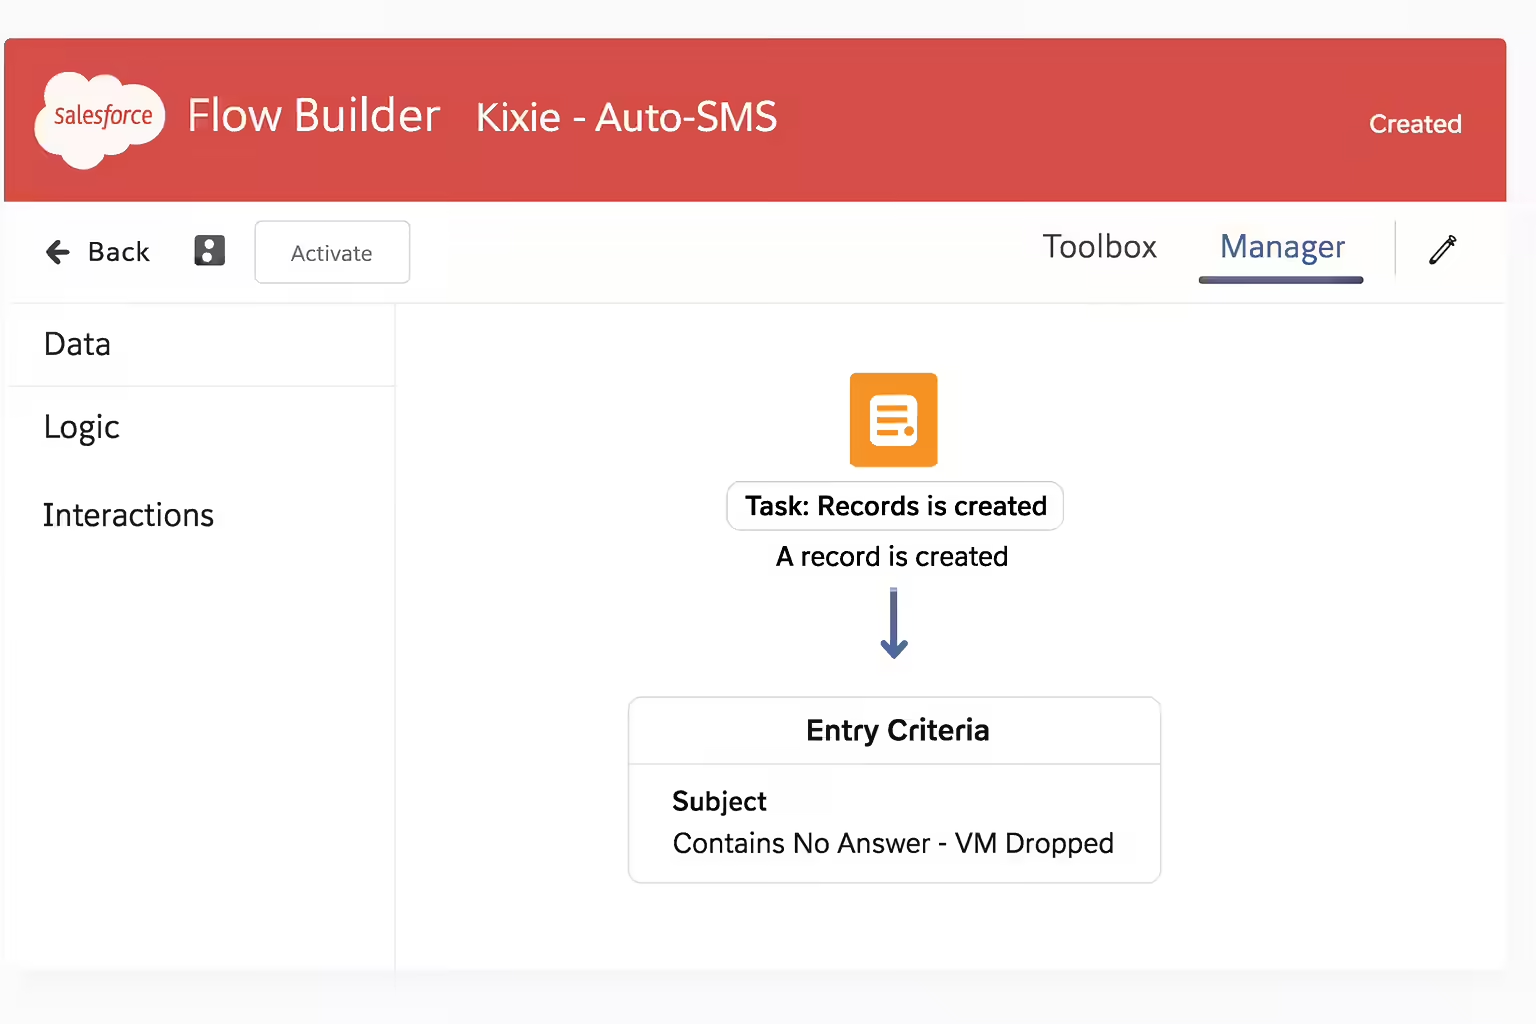
Step 2: Build the "Auto-SMS" Salesforce Flow
Create a new Record-Triggered Flow in Salesforce.
Configure the Trigger:
- Object: Task.
- Trigger the Flow When: "A record is created".
- Set Entry Criteria (Conditions):
Subject|Contains|No Answer - VM Dropped. (The value must exactly match your Kixie disposition name). - Optimize the Flow For: "Actions and Related Records."
Step 3: Trigger the Auto-SMS via Zapier
Create a new Outbound Message in Salesforce Setup.
- Object: Task.
- Name: "Kixie - Send SMS".
- Fields to Send: Pass the related record data, such as
Who.Id(Lead/Contact ID),Who.Phone,Who.FirstName, andOwner.Email.
Create a new Zap in Zapier using a Catch Hook trigger, and paste the new webhook URL into the "Kixie - Send SMS" Outbound Message Endpoint URL field.
In your new Task-based Flow (from Step 2), add an Action element that fires your "Kixie - Send SMS" Outbound Message.
Save and Activate this Flow.
In your new Zap, add a Kixie Action step.
- Event: Select
Send an SMS.
Map the Fields from the webhook data:
- Rep Email: Map the
Owner.Emailfield. - Phone Number: Map the
Who.Phonefield. - Message: Compose a personalized message using merge fields (e.g., "Hi {{Who.FirstName}}, this is {{Owner.FirstName}} from Kixie. I just left you a quick voicemail. You can reach me at this number.").
Publish the Zap.
Summary of Automated Workflow
This configuration changes the lead response process from a passive, manual model (where reps must find leads) to an active, automated one (where the system initiates the contact).
| Metric | Manual Process (Passive) | Automated Process (Active) |
|---|---|---|
| Trigger | New Lead Created | New Lead Created |
| Notification | "Email, Slack, or SF Task ""Ping"" (Rep must see it)" | Kixie auto-calls the rep (Rep must answer) |
| Rep Action | "Manually find lead, open record, click-to-call, manually leave VM, manually type SMS." | "1. Accept the incoming call. 2. Click ""VM Drop."" 3. Click ""Disposition.""" |
| Time to First Touch | 5 minutes - 47 hours5 | < 60 seconds |
| Cadence Execution | "Manual, slow, inconsistent." | "3-touch (Call, VM, SMS) executed in < 2 minutes ." |
| Result | High risk of lead decay; 78% of B2B buyers buy from the vendor who responds first.6 | 391% conversion boost (from 1-min response)5 |
Conclusion
This two-part workflow provides a durable, systemic solution to "speed-to-lead" challenges in Salesforce.
It replaces a passive, manual notification system with an active, automated engagement system that initiates contact.
By configuring Salesforce Flow, Outbound Messages, Zapier, and Kixie, administrators can create a repeatable cadence that triggers an instant call, a one-click voicemail drop, and an automated SMS follow-up for every new lead.
